Cubit 101: Learning the basics
Check how to develop a high-quality app using Cubit 101


Tags
We want to share a basic introduction to Cubit, to learn what it is, how to use it, why it can be super handy, and explore its differences from Bloc (Business Logic Component).
CreateThrive’s mobile team started using it several months from now, and we are loving it!
Cubit: What is it?
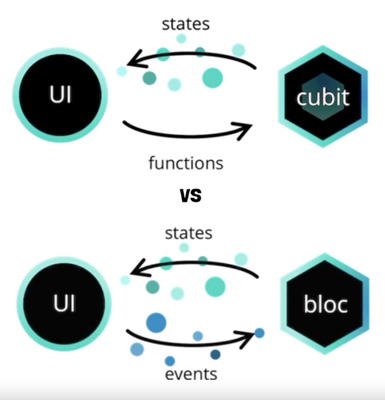
We are talking about a minimal version or a subset of the BLoC design pattern that makes it simple to manage the state of an application. How? It substitutes the use of events (used in Bloc) with features that rebuild the UI by emitting different states on a stream. Felix Angelov suggested merging Cubit into Bloc:
“It was brought to my attention several weeks ago that bloc was being used in a different way by various members of the community. Rather than adding events to the bloc, many developers found it simpler to just invoke methods on the bloc in which new states could be added.”
If we want to put it into a technical definition, a Cubit is a class that encloses an observable state. This works based on the concept of streams but in a super ‘developer-friendly’ way.
Bloc’s major disadvantage is that it’s event-driven and all states don’t benefit from that. In general, this path brings undesired, extra complications and code. On the contrary, Cubit is function-driven, excluding all the complexity of handling events brought by Bloc.
However, this doesn’t mean Cubit will overtake the use of traditional BLoC with events. Both can still be used in different cases, but we won’t get into that in this blog. To sum up, Cubit is a simpler state management solution.
You can use flutter bloc in your Flutter project immediately.
Why choose Cubit
As developers, we always need to:
- Know the state of our application
- Test our app easily
- Use every user interaction to make decisions
- Reuse our code within or outside the code.
These points are all covered by the pattern, allowing us to separate the presentation from the logic and giving several different advantages.
Cubit works as a state manager, which is a really important decision to make when developing high-quality applications. This is crucial to solving everyday problems, like for example, sending information between different widgets.
Cubit: When should you use it and how

The context: This is a small widget tree where A is the parent. The aim is to send part of the data in A to the children. To do so, we can send that information to the constructor of each widget.
The problems:
- To send that data to Widget D, we have to add the data we want to send down to each constructor of each parent of D and when more children that need that data are added to the tree, those widgets and their parents would need to also receive that data in the constructor. Still, we send data to widgets that don’t really need it (Grey nodes).
- How can we easily alter the widget C whenever an update in B is made?
What’s the solution?
Bloc pattern! And by that we mean Cubit. And now you are probably wondering: How does Cubit fix these problems?
Bloc uses the package provider for dependency injection. If we want to use a Cubit, we first need to inject it into our tree. In order to do this, we need to use the BlocProvider Widget.
BlocProvider
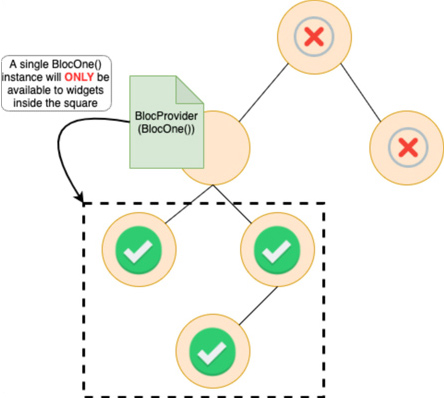
Is a Flutter Widget that builds and provides a Bloc to all its children (known as a dependency injection widget too). Following this, one instance of a Bloc can be provided to various widgets within the sub-tree. In conclusion, the whole subtree will benefit from a single instance of a Bloc injected into it and the entire subtree will depend on the Bloc we are providing.
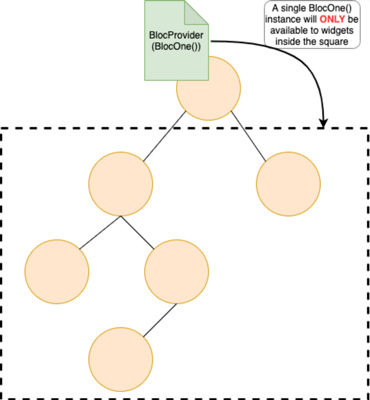
But remember that widgets located above the widget where the BlocProvider is added will not be able to access the Cubit.
First step will be to create a Cubit.
import 'package:bloc/bloc.dart';

class CounterCubit extends Cubit<int> {
	CounterCubit() : super(0);
	void increment () => emit (state + 1);
	void decrement () => emit (state - 1);
}
If you take a look, you will see we have a CounterCubit that extends Cubit<int>. As you can see, in this Cubit, we can only manage an ‘<int>’ as the state. If we want to operate a more complicated structure, we could build another class called CounterState and replace the ‘<int>’ with ‘<CounterState>’ and use the state of the Cubit as such.
In this Cubit, we just have the constructor and two methods. Each one request an emit function with a new state value (‘<int>’), which refresh the state to the provided one (for instance state +1). If the state emitted is equal to the ongoing state, the emit function is null.
Don’t forget that in order to use the Cubit, we need to provide it first. The BlocProvider widget can be built as the following:
class CounterPage extends StatelessWidget {
	const CounterPage({Key? key}) : super (key: key);

	@override
	Widget build(BuildContext context) {
		return BlocProvider{
			create: (_) => CounterCubit(),
              child: const CounterView(),
        );  //BlocProvider
    }
}
Once we provide it, all widgets and sub-widgets inside CounterView() will have the Cubit ready to use. And we will have 3 ways to consume the cubit.
What is the BlocBuilder?
As its name suggests, this widget rebuilds the UI according to the changes made to the Bloc/Cubit state. It might take a lot of time to compute this rebuilding, so we fully suggest wrapping ONLY the widget we are interested in rebuilding, avoiding irrelevant re-renders.
Following its name, BlocBuilder needs a Bloc or Cubit and a builder function. The builder function should be a pure function., meaning everything inside the builder has to lean on the context and the state only.
Thus, on any occasion the state of that Cubit experiments any updates, the build function is called and everything inside the BlocBuilder will be rebuilt. There is another alternative function that we can add named ‘buildWhen’, that limits the builder function to complete only once after a specific condition in met.
About BlocListener
As a Flutter widget, the BlocListener also listens to any state change. It has similarities to the BlocBuilder but, at the same time, it has some differences that we can look at. First, the BlocListener is called only once per state, nevertheless the initial state. This widget also has an alternative function called ‘listenWhen’ that tells the BlocListener exactly when to call the listener function.
Considering the BlocConsumer
This widget merges both the BlocBuilder and the BlocListener. Therefore, if a class has a BlocBuilder and a BlocListener widget, we can use BlocConsumer instead.
To do this, we only have to copy the content of the listener function of the BlocConsumer. Then, we do the same with the content of the builder function (from BlocBuilder) and paste it into the builder function of the BlocConsumer. And that’s it! We now have a more legible code.
BlocSelector
This widget is comparable to the BlocBuilder cubit but has a tiny difference. It receives an extra state (SelectedState) and we need to return (from the current state) the SelectedState we want to listen to. This helps avoid unnecessary builds.
Example
/// Blog widget
class BlogWidget extends StatelessWidget {
 /// Blog widget
 canst BlogWidget({Key key}) : super(key: key);

 @override
 Widget build(BuildContext context) {
  return BlocProvider(
   create: (context) => TutorialCubit(),
   child: Column(
    children: [
     // BLOC BUILDER
     BlocBuilder<TutorialCubit, TutorialState>{
      buildWhen: (oldState, newState) {
       // Only build when a condition is given. [OPTIONAL)
       return oldState.tutorialFinished != newState.tutorialFinished;
       },
       builder: {tutorialContext, tutorialState) {
        // Here we have access to the cubit functions and state.
        // Rebuilds every time the cubits makes an emit with a
        // change in the state.
        // if(tutorialState.tutorialFinished) do something...
        return canst Text('BLOC BUILDER');
       },
      ), // BlocBuilder
      // BLOC SELECTOR
      BlocSelector<TutorialCubit, TutorialState, SelectedState>(
      selector: (tutorialState) {
       // Select a value from the tutorialState and return the
       // selected state (it could be a boolean, an int or even a class!
       return tutorialState.selectedState;
       },
      builder: (tutorialContext, selectedState) {
       // Here we have access to the cubit functions and the
       // selected state.
       // Rebuilds every time the cubits makes an emit with a
       // change in the state.
       return const Text{'BLOC BUILDER');
      },
    ), // BlocSelector
     // BLOC LISTENER
     BlocListener<TutorialCubit, TutorialState>(
      listenWhen: (oldState, newState) {
        // Execute listener when changes are made. [OPTIONAL)
        return oldState.tutorialfinished != newState.tutorialfinished;
       },
       listener: {tutorialContext, tutorialState) {
        // Listen to changes and change values.
       },
       child: canst Text('BLOC LISTENER'),
     ), // BlocListener
	 // BLOC CONSUMER
     BlocConsumer<TutorialCubit, TutorialState>(
      // You can build/listen when a condition is matched.
      // buildWhen: (oldState, newState) => ... [OPTIONAL)
      // listenWhen: (oldState, newState) => ... [OPTIONAL)
      listener: {tutorialContext, tutorialState) {
       // Listen to changes and change values.
      },
      builder: {tutorialContext, tutorialState) {
       return canst Text('BLOC CONSUMER');
      },
     ), II BlocConsumer
    ],
   ), // Column
  ); // BlocProvider
 }
}
Conclusion
If you want to develop a high-quality app, it is very important to plan how to handle the application's state. And I highly recommend using Cubit.
It is a super easy and powerful solution that accomplishes state management in the simplest way. It also has all the necessary tools to answer those state changes anywhere in the application, making it highly dynamic and easy to code.
We can’t find any reason not to use Cubit. It is a hassle-free and time-saving solution.
References
https://www.udemy.com/course/bloc-from-zero-to-hero/learn/lecture/25183780#overview
https://medium.com/flutterdevs/cubit-state-management-flutter-d372ec0044f7
https://pub.dev/packages/flutter_bloc
https://github.com/felangel/cubit/issues/69
https://bloclibrary.dev/#/whybloc
https://verygood.ventures/blog/why-we-use-flutter-bloc