Implementing Firebase App Check in Flutter step by step
Learn the steps you need to take to build a security layer into your mobile app

Firebase App Check in Flutter
Tags
Introduction
If you are reading this, you probably have already started working on the security of your mobile application using Firebase (or other application) security rules, encryption, and user authentication. But you will need one more layer of security and I will explain why in the following paragraphs.
First, we have to start talking about App Check and then learn how to build it in your Flutter app for iOS and Android.
Friendly tip: You should complement this information with the complete description that the Firebase experts listed here.
Why App Check is necessary to protect your backend?
If a third party uses your credentials, they will be able to access your Firebase backend, and that’s not good. With App Check, you will be able to confirm that calls to your data in Firebase are only coming from your app. Also, it ensures that the calls come from an untampered device, not an emulator or jailbreak device, giving you an extra layer of safety.
How it works
In a nutshell, App Check will tell Firebase that the calls are legitime and from your app (or in an untampered device) through a token that is added to your Firebase calls. And at the same time, it will discard the ones that have no tokens or are using invalid ones. For a detailed view of App Check, please read the documentation.
If you want to improve your safety, you should use this feature. It is easy and it won’t take much of your time. Let’s get into it!
Installation
Flutter
The first step is to install the App Check pub package for Flutter and follow the instructions. I strongly recommend checking the pub package, but to ensure how easy it is to apply it on Flutter, here is the only line of code you should add.
void main() async {
WidgetsFlutterBinding.ensureInitialized();
await Firebase. initializeApp() ;
await FirebaseAppCheck.instance.activate() ;
runApp (MyApp () ) ;
With “await FirebaseAppCheck.instance.activate();” App check will initialize. For more information, check the pub package.
iOS
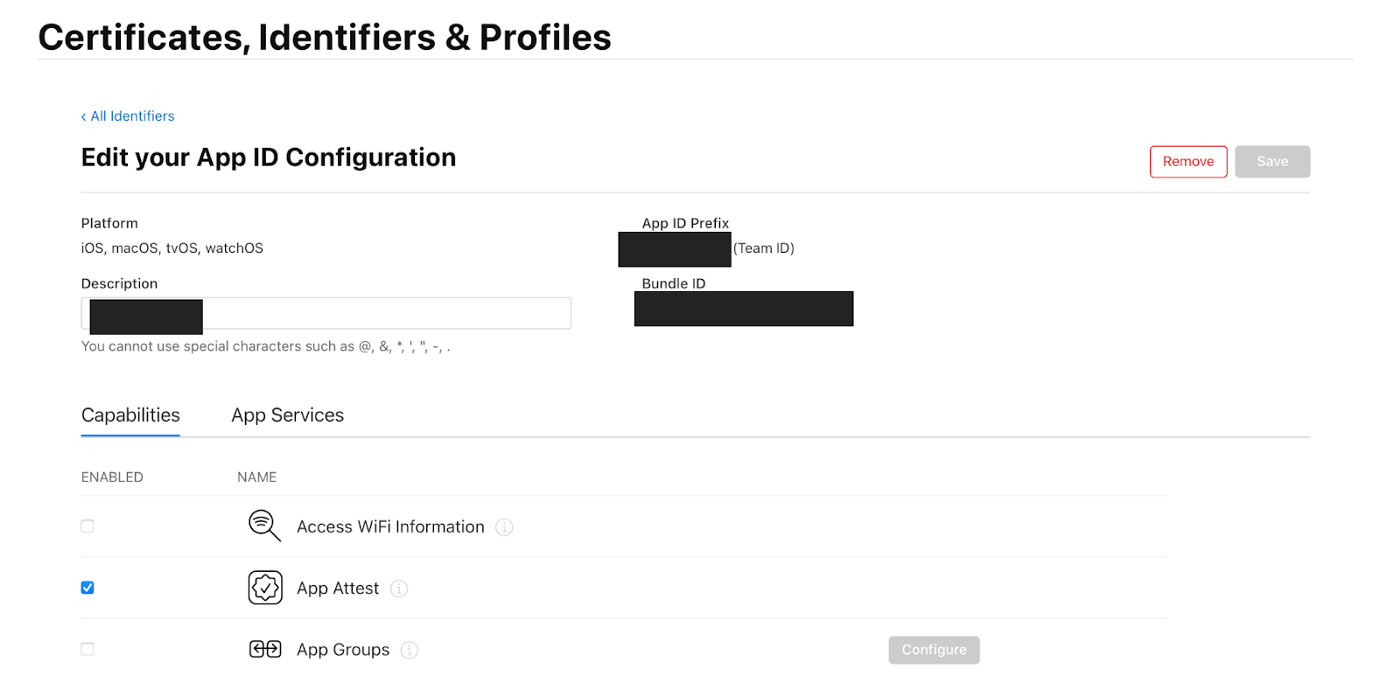
First, you will need to create your Certificate, Identifier and Profile. It is important not to download them until you add App Attest to your identifier.

The next step will be to create a key with device check by pressing the (+) button on the ‘Keys’ section on the column on the left.

After that you will be redirected to the “Register a New Key” screen to create a new key and select DeviceCheck in the checkbox below.

You will continue until the “Download Your Key” screen. Now you should be able to download your key and remember to keep it in a safe place. Also, don’t forget the Key Id!

Once you have finished creating your key, you can now download your Certificates, Identifiers and Profile safely!
Then you will need to go back to the “App Check” section of your application in Firebase, and select “Register the key for iOS.”

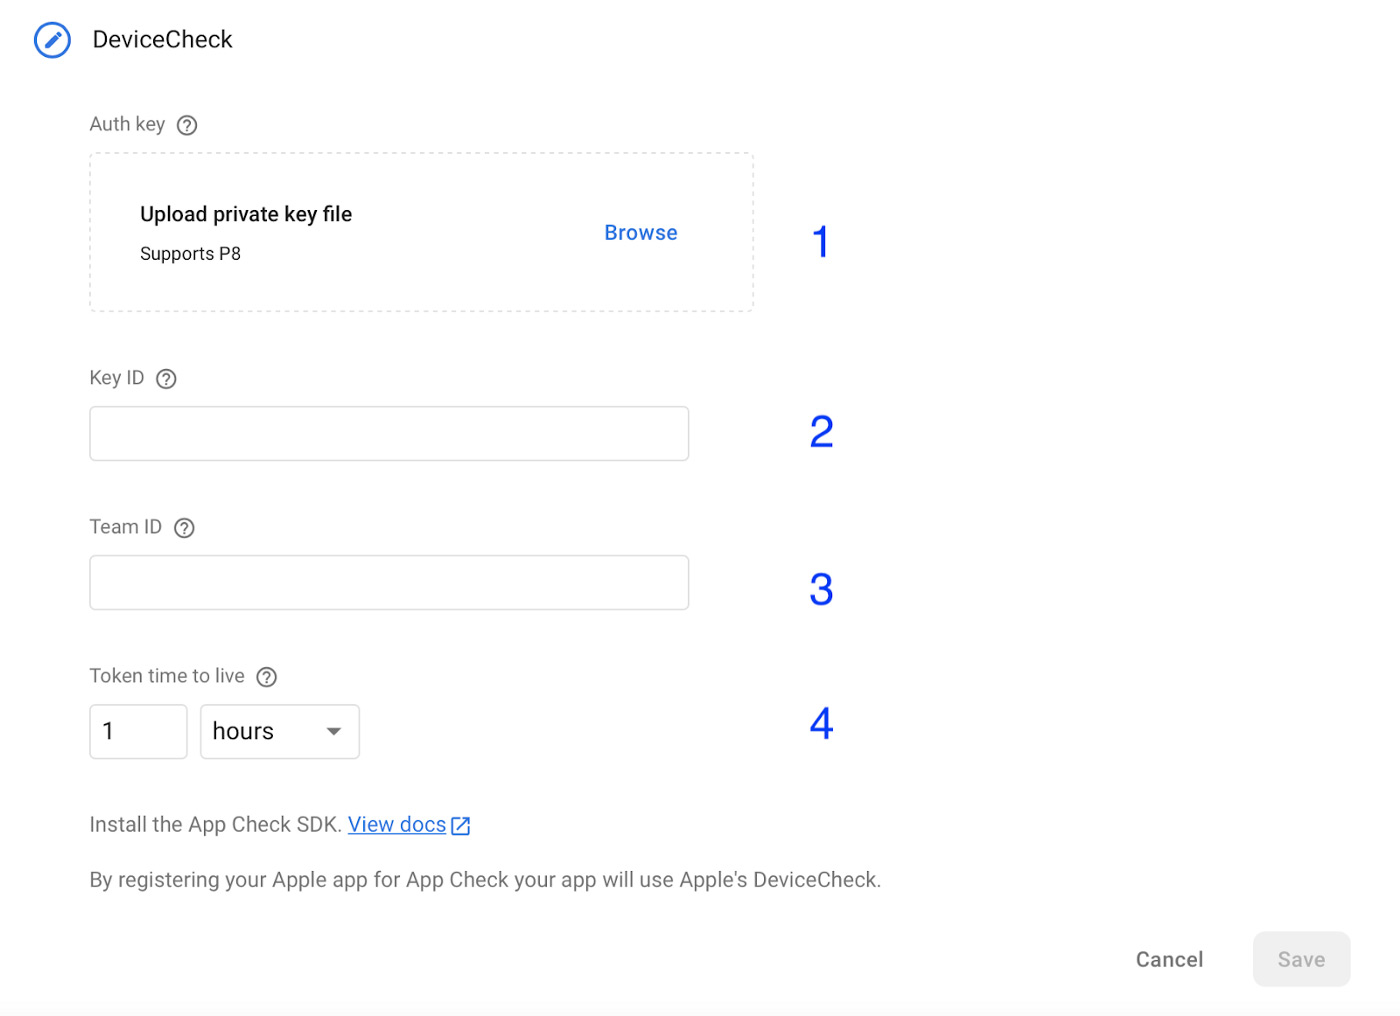
Select “Device Check” to add the key properties.

- Upload the private key file you downloaded before.
- Type the Key ID you got from the key you created.
- Set the Team ID, which is located in the upper right corner of the developer Apple account section.
- The Token Time to Live refers to the period of time after which you want the token to be refreshed. This depends on the app. However, long timeframes are discouraged since they essentially defeat the purpose of using App Check.
Once you complete these steps, you are done with the iOS portion!
Android
The process for Android is very simple and straightforward. Follow these steps and you will have App Check implemented in no time for Android devices!
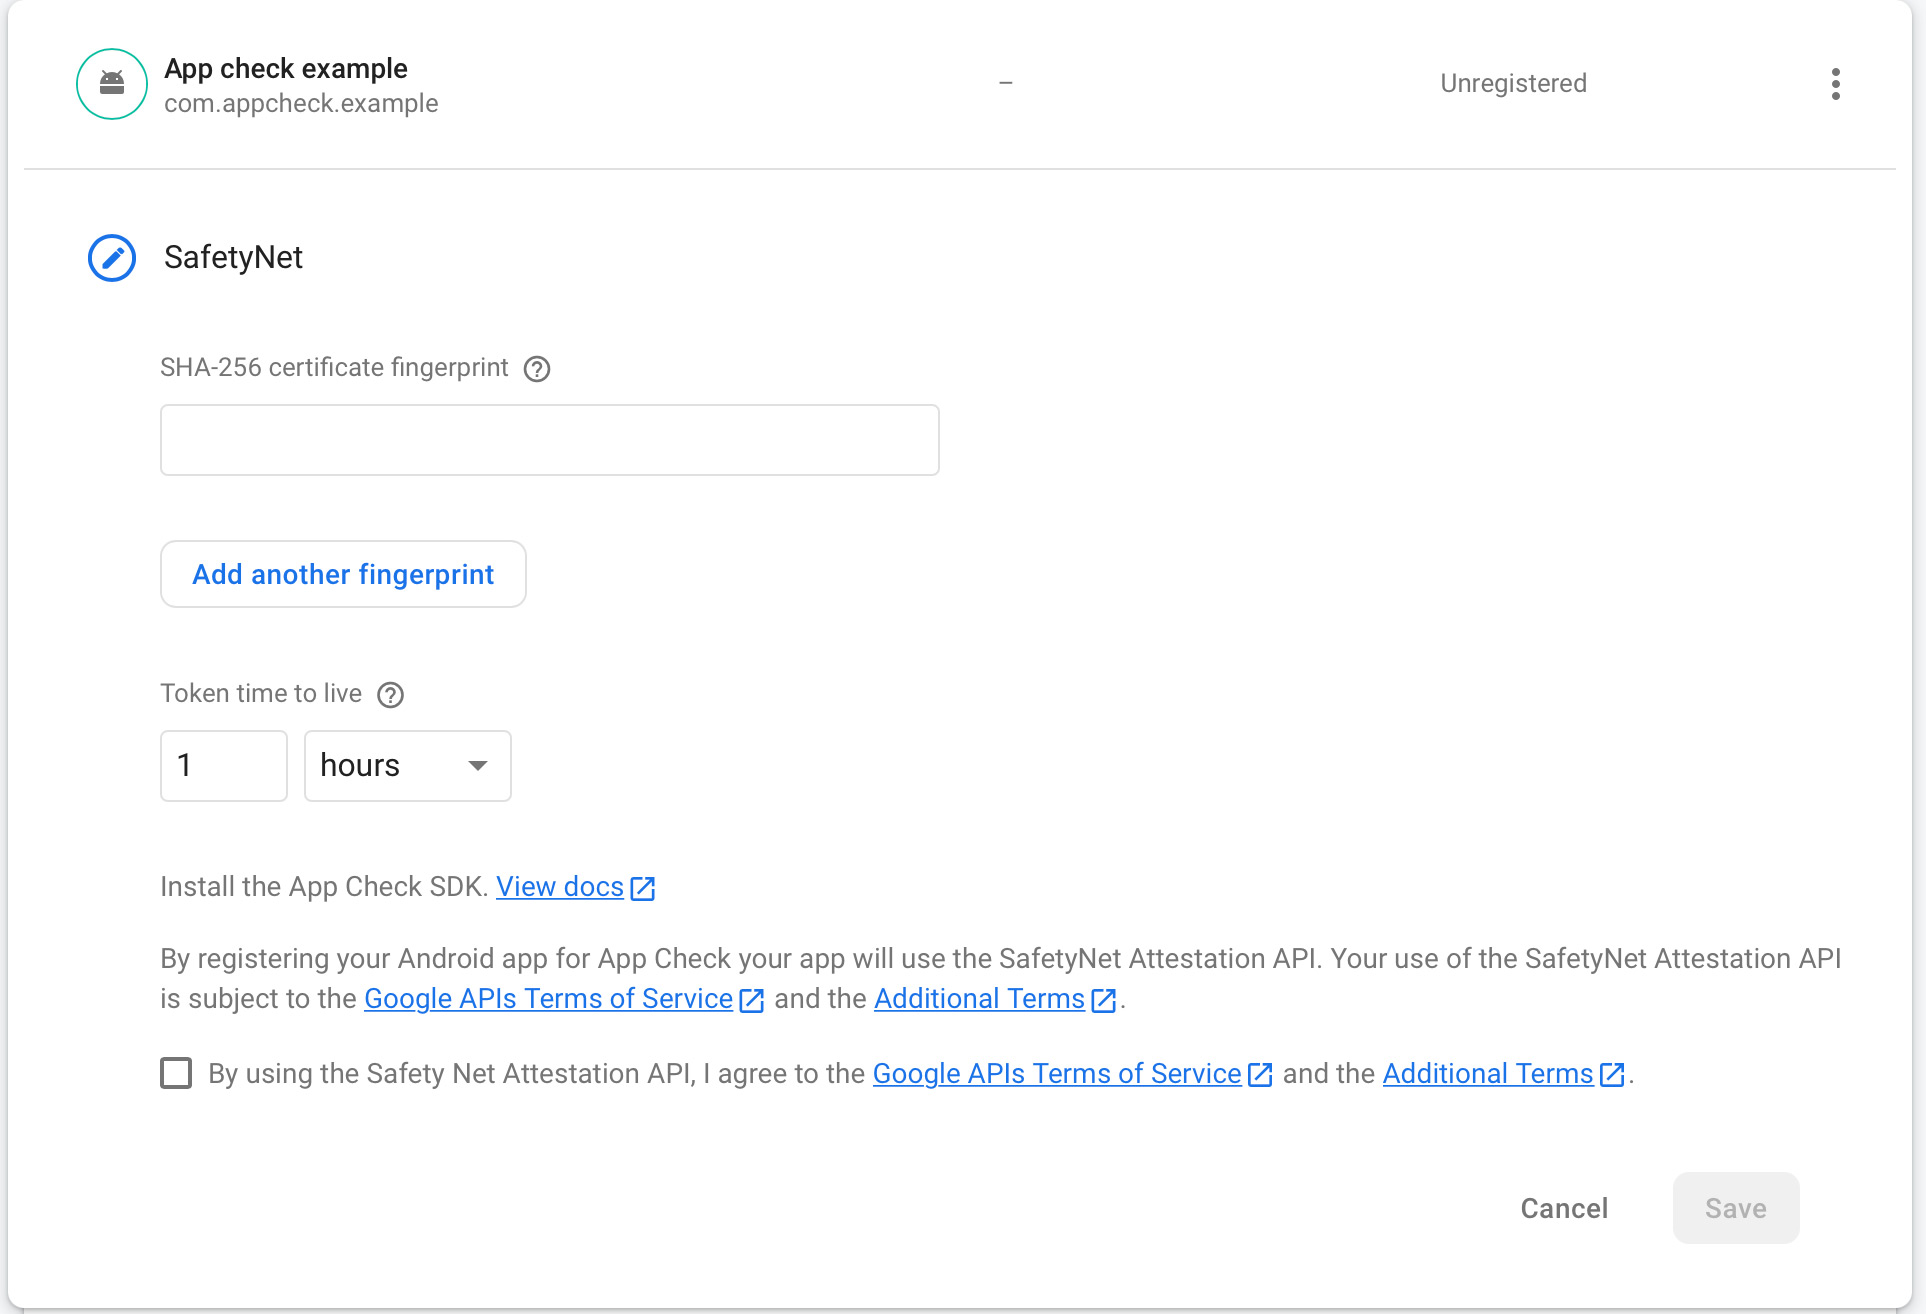
Going into the “App Check” tab in Firebase, you will see that you only need one thing: SafetyNet, which only needs one SHA 256 key to be activated.

Now, where do you get this key? Well, you have to generate the keystore. This allows the app to create a SHA key and lets Firebase identify the app with it. To generate the key, use the following command inside the Android folder of your application:
Generate key
keytool -genkey -v -keystore my-release-key.keystore -alias alias_name -keyalg RSA -keysize 2048 -validity 10000
Disclaimer: If you have Java 9+ you should add the tag -sourcetype JKS
Change my-release-key and alias_name with the name you want.
Then you will be prompted to set the password for the key and confirm it again.
After that, you will have a small questionnaire. Just fill it out and you will have your keystore!
The questionnaire is as follows:
What is your first and last name?
[…]: Your name here
What is the name of your organizational unit?
[…]: Your organizational unit here
What is the name of your organization?
[…]: Name of your organization
What is the name of your City or Locality?
[…]: Your city
What is the name of your State or Province?
[…]: Your State or Province
What is the two-letter country code for this unit?
[…]: Your country code
Is CN=, OU=, O=, L=, ST=, C= correct?
[no]: Yes
Now that you have the keystore, get your SHA 256 key. To get it, you have to run another command:
keytool -list -v -keystore {keystore_name} -alias {alias_name}
Replace keystore_name and alias_name with the ones you used in the previous step.
This will display the SHA keys in the terminal. Copy the SHA-256 key and then go to Firebase App Check configuration.

After inputting the SHA-256 fingerprint, select the TTL you want, accept the Terms and Conditions and then save.
Now, you are done with the Firebase part of App Check. Let’s focus on how to couple the key to your Flutter application!
To do this, create a file named key.properties in the following way:
storePassword=YourSuperPassword
keyPassword=YourSuperPassword
keyAlias=appcheckEx
storeFile=/Users/joaco/Desktop/Appcheck example/appcheck_example/android/appcheck-example.keyst
“Key.properties” is the file responsible for attaching the keystore name to the application.
In that file you should implement the following:
- Your store password
- The Key password you used for the keystore you generated in the last step.
- The alias you used in the last step
- The location of the keystore
After this, you have to go to android/app/build.gradle and add the following lines before the android{}:
def keystoreProperties = new Properties ()
def keystorePropertiesFile rootProject.file ('key.properties')

if (keystorePropertiesFile.exists ()) {
   keystoreProperties.load(new
FileInputStream (keystorePropertiesFile))
}
This obtains the file of key properties and all the information inside.
Then inside the Android{} add:
signingConfigs {
       debug{
           keyAlias keystoreProperties ['keyAlias']
           keyPassword keystoreProperties ['keyPassword'] storeFile keystoreProperties ['storeFile'] ?
file (keystoreProperties ['storeFile']) : null
           storePassword keystoreProperties ['storePassword"]
        }
}
Here you consume the values inside the file and save the properties in the application.
Inside the dependencies, you should have:
dependencies {
   implementation 'androidx.multidex:multidex:2.0.1'
   implementation platform('com. google. firebase:firebase-bom:29.0.01')
   implementation
'com. google. firebase: firebase-appcheck-safetynet:16.0.0-beta03'
   implementation
"org.jetbrains.kotlin:kotlin-stdlib-jdk7:$kotlin_version"
}
Once this is ready, you are done! You are now able to activate App Check on Firebase and your data will have another layer of security!
Different Flavors For Android
If you have different flavors in Android, you should create as many keystores as flavors you have. In this example, I will show you how to create two: One for debugging and the other for production.
Disclaimer: there is a debug option for appcheck. Imagine these steps for Stagging or another environment, the development shown is for example purposes.
You will have to create variables again in the configurations:
def keystoreProperties = new Properties()
def keystorePropertiesFile = rootProject.file ('key.properties')

if (keystorePropertiesFile.exists()) {
	keystoreProperties.load (new
FileInputStream(keystorePropertiesFile))
}

def keystorePropertiesDev = new Properties()
def keystorePropertiesFileDev = rootProject.file('keyDev.properties')

if (keystorePropertiesFileDev.exists()) {
    keystorePropertiesDev.load (new
FileInputStream (keystorePropertiesFile))
}
After that, set your build types. Inside android{} you should have:
buildTypes {
	release {
		signingConfig signingConfigs.release
		//Your other release configs here
	}
	debug {
		signingConfig signingConfigs.debug
		///Your other Debug configs here
    }
}
Then, still inside android {}, your signingConfigs should look like this:
SigningConfigs {
			release {
      				keyAlias keystoreProperties['keyAlias']
					keyPassword keystoreProperties['keyPassword']
              		storeFile keystoreProperties ['storeFile'] ?
file (keystoreProperties['storeFile']) : null
					storePassword keystoreProperties ['storePassword']
            }
			debug {
					keyAlias keystorePropertiesDev['keyAlias']
					keyPassword keystorePropertiesDev['keyPassword']
              		storeFile keystorePropertiesDev['storeFile'] ?
file(keystorePropertiesDev['storeFile']) : null
					storePassword
keystorePropertiesDev['storePassword']
            }
}
Now it should work for the different flavors in Android!
In conclusion:
Adding App Check to your app is always a good idea. It doesn’t take much time and is an easy process. Follow these steps and add a good layer of security to your application!
